
Using Adobe Photoshop Beta with Generative AI
Adobe has released a new version of Photoshop called Photoshop Beta, which is powered by Generative AI. This exciting feature allows you to make stunning updates to your images using simple text prompts. In this tutorial, we will walk you through the process of installing Photoshop Beta and show you how to harness the power of Generative AI to enhance your creativity.
Step 1: Install Photoshop Beta
1. Launch the Creative Cloud app on your desktop.
2. Open the “Beta apps” tab.
3. Find Photoshop Beta and click on “Install” [[1](https://helpx.adobe.com/photoshop/using/generative-fill.html)].
Step 2: Launch Photoshop Beta
1. Once the installation is complete, open Photoshop Beta on your desktop.
2. Sign in to your Adobe account or create a new account if you don’t have one.
Step 3: Familiarize yourself with Generative Fill
1. In Photoshop Beta, navigate to the “Generative Fill” feature.
2. Generative Fill is an AI-powered capability that allows you to add, extend, or remove content from your images non-destructively using text prompts.
3. It can help you achieve realistic results in seconds, surprising and delighting you with its capabilities.
Step 4: Using Generative Fill
1. Open an image you want to edit in Photoshop Beta.
2. Select the area or object you want to modify using Generative Fill.
3. In the Generative Fill panel, enter a text prompt that describes the changes you want to make.
4. Experiment with different prompts to achieve the desired effect.
5. Photoshop Beta will apply AI algorithms to interpret your prompt and generate the corresponding changes in your image.
6. Preview and fine-tune the results to your satisfaction.
Step 5: Additional Tips and Tricks
1. Generative Fill can be used for various purposes, such as removing distractions, extending backgrounds, adding objects, and more.
2. Take advantage of the AI capabilities to explore creative possibilities and push the boundaries of your imagination.
3. Experiment with different text prompts to discover unique and unexpected results.
4. Remember to save your work regularly to preserve your progress.
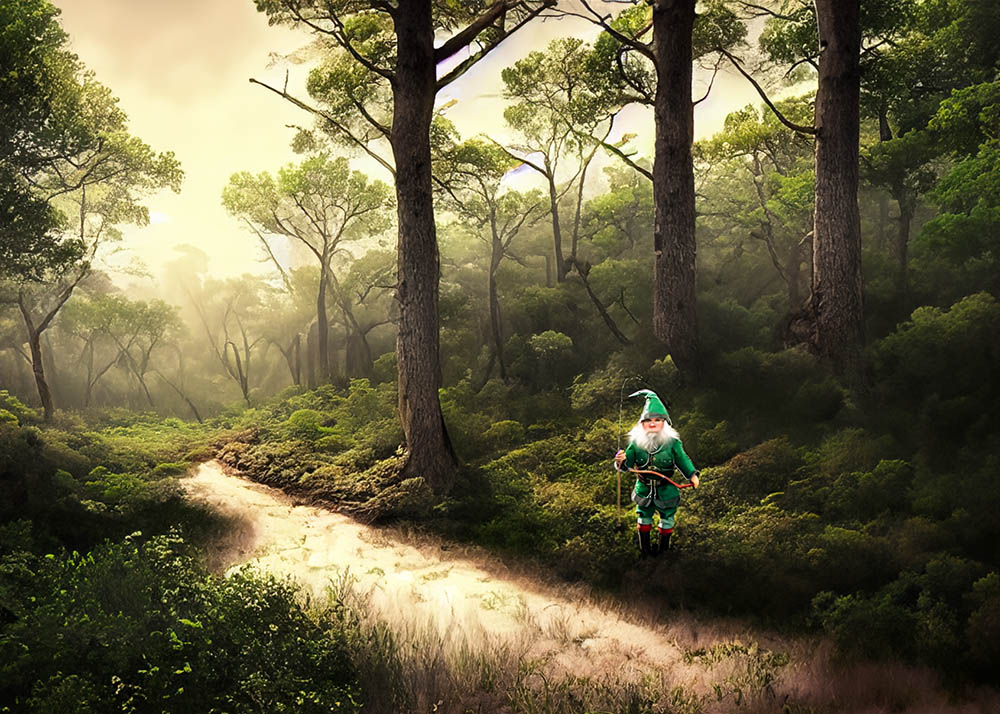
Examples
I created a blank image with white background, selected the entire blank image and instructed it to generate a forested landscape, of the three examples it created I choose this one.
Next I used the Lasso tool and selected an area on the stream bank and said add an elf fishing.
Then using the lasso tool again I selected an area at end of the stream and said add a dragon.

Finally I selected an area of sky and had it add a bird.

Conclusion:
Adobe Photoshop Beta with Generative AI opens up a world of creative possibilities. By leveraging the power of AI, you can achieve stunning image edits and enhancements in a fraction of the time. Install Photoshop Beta, explore Generative Fill, and unleash your creativity like never before!
Note: This tutorial is based on the information available as of June 6, 2023. Please refer to the official Adobe documentation and resources for the most up-to-date instructions and features [[1](https://helpx.adobe.com/photoshop/using/generative-fill.html)].
References:
1. Adobe Photoshop Help: Experience the future of Photoshop with Generative Fill.
https://helpx.adobe.com/photoshop/using/generative-fill.html
2. Hongkiat: How to Install and Use Photoshop with AI (Photoshop Beta). https://www.hongkiat.com/blog/photoshop-generative-ai/
3. Adobe: Generative Fill – Adobe Photoshop.
https://www.adobe.com/products/photoshop/generative-fill.html
4. Digital Camera World: How to extend a background with Photoshop’s new Generative AI tool.
5. DPReview: Generative Fill in Photoshop (Beta) Hands